

There has been lots of debate in South Africa and around the world on whether or not it is a good idea to wear a face mask during the Covid-19 pandemic. Given current scientific understanding of how the virus is transmitted, the Western Cape Department of Health is now recommending the use of cloth face masks for people when they go outside, even if they are not ill.
Very importantly, a cloth face mask does not provide complete protection. You MUST continue to follow these important hygiene practices:
1. Wash your hands regularly for at least 20 seconds with soap and water;
2. Do NOT touch your face with unwashed hands;
3. Cough or sneeze into a tissue (and throw this away) or into the corner of your arm;
4. Keep a distance of 1.5m from other people;
5. If you are ill, stay at home.
However, a cloth mask – if used appropriately and cleaned well – can offer some protection in these ways:
1. It reduces the transmission of and inhaling of droplets between people (coughs and sneezes);
2. It reduces exposure in overcrowded areas (i.e. taxis, shops, etc);
3. It increases awareness of Covid-19;
4. It is inexpensive and can be made at home or produced in large quantities.
Cloth masks should be worn whenever you are out of your house or interacting with others.
Click here to visit the Western Cape Government’s Department of Health article about fabric masks.
***
Instructions on making a cloth face mask
The following instructions have been provided by Brendon Bussy, Masha Du Toit and Moira Vural.
See the full slide show here.
The pictures show how a mask can be made easily with a sewing machine. But you can also sew it with a needle and thread.
Remember to make TWO masks for yourself. When you have used one, wash it in soap and hot water. Dry it in the sun and then iron it. This will kill the virus. While the one is being washed, you can wear the other clean one.
Tools and materials:
1. Washed fabric* (i.e. an old bed sheet, dress or shirt BUT not a stretch fabric like a t-shirt)
2. Tie fabric (i.e. string, shoe lace, ribbon, elastic, etc)
3. Sewing machine OR needle and thread
*The fabric must first be washed in hot water as it may shrink after the first wash. If you wash it first then it won’t get smaller.
Step 1: Cut your fabric and ties
Cut two rectangles of fabric so that each rectangle is: 23cm by 20cm.
Cut four ties so that the ties are 30cm long (if made from something stretchy like elastic) or 50cm long if made from something non-stretchy (like string).

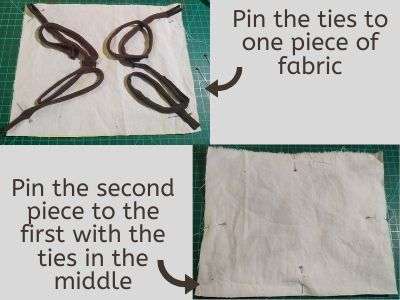
Step 2: Pin the ties to the fabric
Lay one piece of fabric on a flat surface.
Pin each of the ties to each corner of the fabric with the ties drawn into the middle of the fabric.
Take the second piece of fabric and pin this over the first.
This means that the ties are hidden inside the two pieces of fabric.
Step 3: Sew the two pieces of fabric together
Sew around the edge of the fabric – approximately 2cm from the edge.
Leave a 5cm space on the one edge where there is no sewing.

Step 4: Turn the mask inside out
Using the ties to pull, reach through the space where there is no sewing and turn the mask inside out.
You will now have a rectangle of two layers of fabric with four ties coming out of each corner.

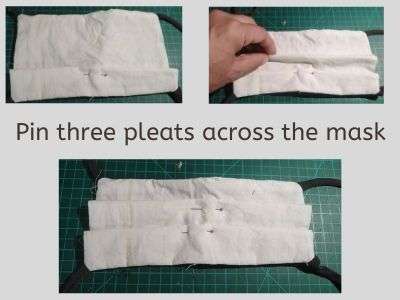
Step 5: Make pleats for the mask
Pinch and pin the mask so that there are three sets of pleats running along the front of the mask.
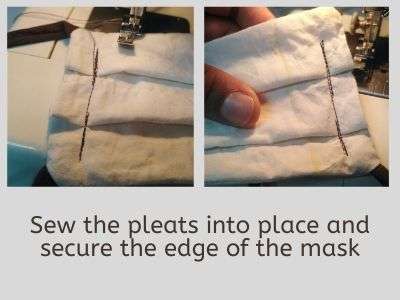
Step 6: Sew the pleats in place
Sew along the two shorter edges so that the pleats remain in place.
This must be done on both the left and right edges, and then it should be sewn around the edges too.
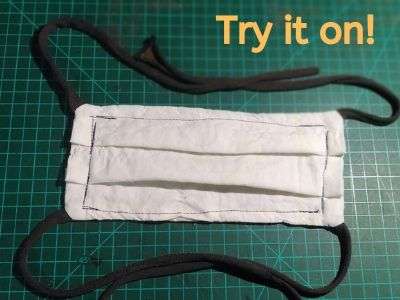
Step 7: Try it on!
Your cloth face mask is now complete.
Slip it over your nose and mouth and tie it at the back.
For added protection, include a third layer of fabric in the middle of the mask. This fabric should be a closer weave than the outer fabric, such as the lining for a jacket or similar.
***
Tell us: Are you able to follow these instructions? Let us know how you get along…